Biyernes, Hunyo 21, 2013

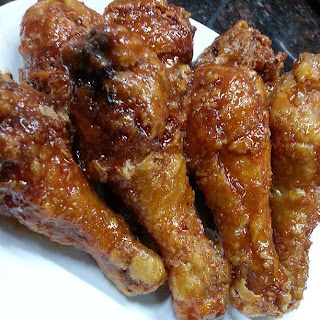
Crispy Chicken Fry

BRIEFING:
There are so many ways how we make breading, batters, bread crumbs... I have some observations that may help you identify the way on how you will cook your fried dishes with their coats. 

A. ORIENTAL/CHINESE/ASIAN WAY
-Often use cornstarch in dredging (dry) their meat dishes before frying.
-or they dilute cornstarch with water, add salt and pepper, dip the meat dishes then fry. 
B. WESTERN WAY
-FLOUR-EGG-FLOUR, meaning to say... dredge the meat into the flour for 1st coating, 2nd step is to dip into beaten egg and 3rd step is the final coating which is again the flour and then fry.
-BEER BATTERED is another story. Will post about beer battering soon. 
C. JAPANESE WAY
***KATSU DISHES 
     -FLOUR-EGG-BREAD CRUMBS, meaning to say... dredge the meat into the flour for 1st coating, 2nd step is to dip into beaten egg and 3rd step is the final coating which is the bread crumbs then fry.
***TEMPURA DISHES
      -dredge your seafood or vegetables on dry flour then dip it in your cold tempura batter mix then fry.  (recipes for tempura will soon be posted here in my blogspot)

INGREDIENTS:
Chicken Breasts
Cornstarch
Black Pepper Ground
Salt
Minced Garlic (fine)
5 spice
BBQ Powder
Garlic Powder
Brown Sugar
Calamansi
Soy Sauce (Kikkoman, or local brands ex. knorr seasoning, silver swan etc.)

1. Slice your chicken breast thinly, make a butterfly cut to make the chicken look big!
2. Marinade the chicken with calamansi juice, ground pepper, soy sauce, minced garlic, Garlic Powder, Salt and Sugar overnight. 
3. Mix BBQ powder, 5 spice, black ground pepper and cornstarch for the dredging. 
4. Coat chicken evenly with dry mixture, then fry. 
5. serve.

TIPS:
Preheat the oil with low low fire, Fry a little longer to make it crispy!


I don't usually measure the ingredients! i hope this still helps!  


Martes, Hunyo 18, 2013

Sauteed Spicy Squid

Ingredients:
Squid (Skin removed, sliced with your desired shape and style)
Minced Garlic
White Onions (Cloves)
Bell Peppers (Big Squares)
Celery (1 small stalk, Sliced diagonally)
Wansuy (to make it fragrant)
Baguio Beans (few pieces, Sliced diagonally)
Minced Ginger
Black Ground Pepper
Thai SOS/ Thai Sauce
Kikkoman Soy Sauce
Drops of Knorr Seasoning
1-2tsp Brown Sugar
1tsp Cornstarch, diluted in 1tsp water
Fresh Chopped Chilies (optional)

1. Saute everything: (should be medium-well done)
   1.1 onions
   1.2 bell peppers
   1.3 garlic
   1.4 kikkoman soy sauce 
2. If fragrant, add stalks of celery, wansuy & baguio beans.
3. Add in Squid, mix everything well. 
4. If the squid had curled up, then 2tbsp Thai SOS/Thai Sauce and sugar to be added by this time. 
5. Finally, pour the cornstarch mixture to make the sauce thick. 
6. Remove from heat then serve. 

TIPS:
1. Restaurants has their secrets to make the squid tender and a little crunchy... they dilute 1 tbsp Sodium Bicarbonate/Baking Soda for every kilo of squid (skin has already been removed) into the water then refrigerate for one hour or sometimes even more.
It will be up to you if you want to do this tip or not anymore. After this preparation, wash well with running water before cooking it. 
2. This dish should only be prepared in less than 10 mins for medium heat or less than 5 mins in  large flame.
3. I often use sherry/white cooking wine in sauteing dishes like this. Well, again, it will be up to you if you want to include this or not. 
4. Few drops or tablespoons of Sprite/7 up can also be included in sauteing. This is a little secret that I would want to share.  It can minimize fishy odors especially on seafoods. 

Sabado, Hunyo 15, 2013

Bonchon Chicken, My Way

Ingredients for the Chicken:
Any Part of the Chicken (Wings, Thigh or Drumstick)
Cornstarch (Dry Dredging or if you want a thicker crumbs, you may opt to Make a cold batter with 1 Cornstarch:1 Flour)
Knorr Seasoning or Master Soy Sauce
Black Pepper Ground


1.  Massage Chicken with Black pepper ground and Knorr seasoning/Master Soy Sauce.
2. Dredge Chicken into Dry Cornstarch/Cold Batter, then fry. (Make sure you preheated your oil in very low heat, we don't want to burn our chicken  right away)
3. Strain Oil. Make sure the chicken won't get soaked with dripping oil, otherwise it will not be crunchy anymore. Set aside.

For Hot Chili Flavor Glaze: >>>>>>>
Light Corn Syrup
Thai Sos/Thai Sauce
Knorr Seasoning
Chinese Chili Sauce (Condiments from Chinese Restaurants/ or check out my Chili Sauce Recipe Soon)


For Soy Garlic Glaze: >>>>>>
Light Corn Syrup
Knorr Seasoning
Salt
Sauteed Garlic (Minced/Fine)


GLAZE
4. Mix all ingredients from the Glaze recipe in a pan, make sure you finalize the sweetness first before heating it.
5. In very low heat, wait until the sauce get some little bubbles on the side. Turn of the heat.

GLAZING THE CHICKEN
6, USING a BRUSH, glaze your chicken, coat all the sides and place it in a liner tray or a nice serving plate. (DO NOT DIP the CHICKEN on our glaze mixture)
7. Serve.


TIPS:
Deep Fry your chicken in low heat and longer time. We want to achieve the tenderness and the crispyness of the chicken.
Make sure chicken has already drain its excess oil before brushing the prepared glaze sauce.


I AM VERY SORRY, I DON'T USUALY MEASURE MY INGREDIENTS, I HOPE THIS STILL HELPS!

Biyernes, Hunyo 14, 2013

Mushroom Burger

Ingredients:
100% Lean Beef (1/2kg beef=1 Can Button Mushrooms)
1 can- Button Mushrooms (chopped/Minced)
Big White Onion (Minced)
Salt
Black Ground Pepper LOTS!
1/4 cup Minced Garlic
Steak Sauce or A1/Worcestershire
Knorr Seasoning
1 egg
3tbsp All Purpose Flour
2tbsp Cornstarch


1. Mix ingredients all together
2. Use a scoop or a measuring cup to make patties even.
3. Form a ball, then flatten the patty with your desired size and thickness.
4. Grill or pan fry.
5. Serve with Mayo,Gravy or Ketchup.

TIPS:
If you have a sizzling plate at home, you can use that to make a Salisbury Steak  topped with a raw egg then serve with gravy. 

Can also make a Hamburger Sandwich with cheese, lettuce and tomato.

You can also store your patties in the fridge for future home cooking FAST FOODS!


I REALLY DON'T MEASURE MUCH OF MY INGREDIENTS, I HOPE THIS STILL HELPS! 


Lunes, Hunyo 10, 2013

Pork Steak

Ingredients:
White Onions in Rings (save some for garnishing)
Oyster Sauce
Kikkoman Soy Sauce
Brown Sugar
Ground Black Pepper
Brown Sugar
Calamansi Juice
Cornstarch
7up or Sprite
Salt
Oil for FryIng
Pork Chops or Pork Cutlet

1. Mix Cornstarch, Salt & Pepper.
2. Massage meat with dash of salt & pepper.
3. Dredge onto Cornstarch mix. then deep fry.

4. In a separate pan, saute onions with kikkoman soy sauce.
5. Add oyster sauce, soy sauce, Soda, squeezed calamansi juice, brown sugar, black pepper ground. (This should be a little soury taste, with mild sweetness.)
6. Mix 1tsp of cornstarch in 1tbsp of water. Mix. Once thicken, remove from heat.
7. Pour the sauce over our fried meat, garnish with sliced Onion Rings. Serve.

TIPS:
This is almost like Beefsteak Tagalog. Only done in a different  version.

I DON'T MEASURE MY INGREDIENTS, I STILL HOPE THIS RECIPE WILL GUIDE YOU. ENJOY!

Twisted Spanish Sardines Spread

Ingredients:
1 can of liver spread (Preferably RENO)
1 Bottle of Spanish Sardines (Any Brand)
Black Pepper Ground
Chili Powder or Fresh Chilies (Optional)

1. Mash the Spanish Sardines using a fork.
2. Mix all the ingredients in a bowl.
3. Enjoy this recipe with your favorite Breads or bread sticks!

TIPS:
You can keep this recipe for about a month once refrigerated!

Classic Savory Chicken

My Little Story...
I grew up being so exposed with the famous Classic Savory Chicken. My Dad would always bring home 1 whole Chicken for the Family and at times, he would often wake us up in the middle of the night just for midnight snacking...  I have never thought that this Classic Flavorful Chicken will be made from the most basic and easiest ingredients stapled from your kitchen!

Here's my Version of The Famous Chicken originted from Escolta, Manila!

Ingredients:
only "SILVER SWAN" Soy Sauce
Water
Star Anise
Ground Black Pepper
1/2 tsp Oil 
All purpose Flour
1 Whole Chicken/or any Special Part

1. Boil and mix Soy Sauce, black pepper, water, 1/2 tsp Oil, star anise (About 8 pcs.) then Cool. (this should make about 2 cups yield, we will be using this for marinade, brushing/basting and the final gravy!)
2. Clean your chicken well, pat dry using kitchen tissue, marinade chicken with prepared sauce over night. 
3. Preheat your oven to 325 F.
4. Roast your chicken for about 45 minutes or so, or until the skin turns dark golden brown. You can also use a toaster for smaller servings with same amount of cooking time. 
5. Using the reserved marinade, mix about 1/2 tsp of flour for every 1 cup of Sauce, boil then cool. We want to achieve the "NOT SO THICK" gravy from Savory Chicken. Perhaps, you may lessen or add a little more amount of flour depending on the thickness while you are cooking you gravy. 

TIPS:
Brush your chicken with prepared sauce every 8-10mins. This will make the Chicken very juicy and tender. 

Serve and Enjoy!

SORRY AGAIN... I AM NOT USED TO MEASURE MY INGREDIENTS! BUT I HOPE THIS STILL HELPS!


Linggo, Hunyo 9, 2013

Buttered Garlic Rock Lobster

How to Clean It:
1. As soon as these creatures arrive in your kitchen alive and moving, the first thing that you will be doing is to "CLEAN" them. 
2. Boil water with pinches of salt in a big wok enough to cover the whole body of the lobster. (If big wok is not available, you can use a big POT for this)
3. 100 C water,  boil the live lobster for about 10 mins. Remove, then drain. 
4. Use a toothbrush to clean all the areas of the lobster, brush thoroughly under running water. 
Note:
***This style is only applicable for lobster.
***For the crabs, it's a different story....
***Upon buying these lobsters, "sometimes", sellers remove the pincher/crusher claws for consumers safety. 

Ingredients:
Butter
Minced Garlic
Freshly Ground Pepper
Salt
Veggies (Carrots/Broccoli/Beans)

1. After Cleaning your lobster, boil the water again in your large wok with pinches of salt and pepper, this will start the cooking process
2. Dip Lobster.
3. It will be depending how big your lobster for the cooking time. For those small ones, 10mins after boiling will do. for big lobster like these, it took me about 30mins or so. 
4. Remove Lobster, drain, room temp. 

How to remove the Hard shell? 
5. Turn your lobster upside down.
6. Cut all the Walking legs.
7. DO NOT CUT the Antenna, If it's too long, then just cut about 2-3 inches long. We are saving this for the final presentation. 
8. For the Tail Meat:
Cooking instructions often suggest cutting straight down the middle of the lobster; I use a different technique that enables you to remove the tail in one piece. Place the lobster tail on a work surface, shell side down. Using kitchen scissors, you start at the wide end, cut all the way down 1 side to the end of the tail. Repeat on the opposite side. Pull back the membrane to free the tail meat. Pull out the tail meat in 1 piece. The tail can now be sliced into medallions.
9. For the Head, using kitchen scissors,
slowly cut the edges of the  meat and shell, save the juices, then pull it out carefully. 

Cooking:
10. Again, the amount of butter will be depending how big is your lobster.
for this sample size, I melted about 1/4 cup of Unsalted Butter.
11. in a bowl, mix freshly minced garlic, salt and pepper.
12. When desired saltiness and taste are being achieved, transfer everything in a pan.
13. in Medium heat, Mix the pre-boiled lobster meat and the Buttered Garlic for about 3-5 minutes. 
14. Remove from heat then seat aside. 
15, Boil or Saute your veggies in salt and pepper for the sides.
16. Arrange Lobster Meat onto your serving Tray.
17. ArrangeVeggies around the sides of the serving tray. 
18. Place the Saved Shell on top of the Lobster meat for garnish. 
19. Serve & enjoy!


TIPS:
Storing Lobster
Live Lobster
***If possible, cook live lobster immediately. If it is not possible, store in the refrigerator.
***Cover the lobster with wet newspaper or a damp dish towel and place in an UNCOVERED container. (If stored covered in an airtight container, the lobster will suffocate.)
***Store in the coldest are of the refrigerator, which is generally in the back of the top shelf.
Cook within 24 to 36 hours.

Lobster - Cooked
***Place cooked lobster in an airtight container and place in the refrigerator.
***Cooked lobster stored in the shell can be stored in the refrigerator for 2 to 3 days.
***Cooked lobster meat that is removed from the shell can be stored in the refrigerator for up to 4 days.

Freezing Lobster
***Uncooked Lobster - For the best quality lobster, freeze uncooked. Place lobster in a freezer safe container or bag, or wrap tightly in freezer paper. Remove as much air from whatever type of storage packaging is used. Label the package with contents and date, and place in the freezer as soon as possible.

***Cooked Lobster (in the Shell) - Cook lobster, drain, and allow to cool. Place in a freezer bag, squeeze out all excess air and seal tightly. Label the package with contents and date, and place in the freezer as soon as possible. Note: If desired, the lobster tail can be removed and frozen just on its own. If the lobster has large claws that would contain a fair amount of meat, also detach them and freeze with the tail.

***Cooked Lobster (Meat Removed from Shell) - Cook lobster, drain, and allow to cool. Remove meat from the shell. Mix a brine solution consisting of 2 teaspoons of salt per cup of water. Place the lobster meat into a freezer safe container or bag and cover with the brine solution, leaving 1/2 inch for head space to allow for expansion when freezing. Remove any excess air and seal tightly. Place in freezer immediately.

Lobster can be stored in the freezer for 2 to 3 months.
Thaw frozen lobster in the refrigerator or under cold running water. Do not thaw at room temperature.


Sabado, Hunyo 8, 2013

Home Made Salsa Dip/ Sauce

Ingredients:
Red Bell Pepper
White Onions
Tomatoes
2-3tbsp Heinz Tomato Ketchup
Ground Pepper
Salt
Lemon Juice, Half lemon
1tsp of Parsley, Chopped
Tabasco (Optional)
Blender or Food Processor

1. Mix all together using a food processor.
2. Ratio for Tomatoes, Bell Peppers and Onions will be 1:1:1
3. Pinch of salt, dash of pepper.
4. Serve.

Tips:
You can make lots of these, and keep in a clean container for about 2-3 weeks in the fridge.
Top with fried dishes or dip with nachos.


Kid's Style Baked Macaroni

Ingredients:
Ground Beef 100% Pure Lean Meat (So it will not be oily)
Macaroni
Cream Cheese
All purpose Cream
Quickmelt Cheese
Tomato Sauce or Sweet Style Tomato Sauce
Banana Ketchup
Ground Pepper
1 tbsp Garlic, Minced
1 whole White Onion, Cubed
Green and Red Bell Peppers, Cubed
Hotdog Cubed (Optional)
1 tsp Soy Sauce
Brown Sugar (optional)
Olive Oil, Oil or Butter, 1tbsp for a Kilo of meat, and 1sp for 1/2 kg of meat


1. Heat your Oil or butter in pan (medium heat). add in Onions and Bell Peppers, then garlic, then soy sauce to make it fragrant. well done. 
2. Next will be the beef... mixing in low heat. 
3. Add the tomato sauce or sweet style Tomato or Spaghetti Sauce, 2 tbsp Banana Ketchup, Brown Sugar (optional), ground pepper, hotdogs (optional)
4. When everything is bubbling.. add in 1 tetra pack of All Purpose cream.
5. Grate about 1/4 cup of cheese. Add. 
6. turn off heat.

7.Cook your macaroni based from packaging directions. Drain.
8. Mix the Macaroni and the sauce. We don't want to be too Saucy. We just want to cover or coat the entire macaroni with the prepared sauce. 
9. Place everything in the baking dish.

Topping:
10. Mix Cream Cheese (1tbsp, or 1"x1" cream cheese sliced) and 1 tetra pack of all purpose cream.
11. Pour over the Macaroni.
12. Grate some cheese on top of the cream cover. 
13. Bake for about 20 minutes in 350F.
Remove from oven when the cheese melts and bubbles.

Sit then refrigerate.
Slice and place in microwave oven to reheat for about 1 min., then serve. 

SORRY I DON'T REALLY MEASURE THE INGREDIENTS, I STILL HOPE THIS HELPS.


Biyernes, Hunyo 7, 2013

Japanese Beef Gyudon

Ingredients:
Sukiyaki Cut Beef, in Strips
Kikkoman Soy Sauce
Roasted Sesame Seeds
Brown Sugar
Ground Black Pepper
White Onions, Sliced
Butter or Oil

1. Heat butter or oil, add white onions, then Kikkoman Soy Sauce until well done and fragrant.
2. Add the add, more drops of Kikkoman, brown sugar and pepper. (Kindly achieve the color of my posted Actual Sample)
3. Arrange and serve. Top with Roasted Sesame Seeds to garnish.

Tips: How to make Roasted Sesame Seeds? Just place sesame seeds on your pan in low heat (no oil). Avoid well done/burning. Remove from heat if fragrant. 

You can Prepare this dish in less than 10 minutes. 

SORRY I DON'T REALLY MEASURE THE INGREDIENTS. I STILL HOPE THIS HELPS

Home Made Skinless Longganisa

Ingredients:
Pork or Chicken Breast, Ground.
Optional: Pork Fat or Chicken Fat
Brown Sugar
Fine minced Garlic
Black Ground Pepper
Iodized Salt
Garlic Powder
Plastic for Molding, or Wax Paper
Replacement for Red Food Coloring: UFC Ketchup. (Optional), drops only. to make it pinkish.

1. Mix all ingredients together. make sure that you ground your Chicken in "Fine Mode".
2. ratio of Brown sugar and salt is 75%:25%
3. Put as much as pepper as you want
4. The more Garlic, the better. maybe about half cup of garlic in a Kilo of meat.
5. Use a scooper/ice cream scoop/measuring cups to  make an even amount of meat onto your wax paper.
6. Roll it to your desired size.

7. Refrigerate or put it inside your freezer for about 2 days to sit.
8. Cook and serve.

Tips:
Place longganisa in a pan with water. bring to boil, lower your heat. When it dries up, add little oil and sprinkle with brown sugar.

If you want your longganisa be moist and juicy, just add Fat, That's it!

This is a Phosphate/Acid free Recipe. 100% Home Made! ENJOY!


SORRY I DON'T USUALLY MEASURE THE INGREDIENTS. I STILL HOPE THIS HELPS!


Chicken Teriyaki


.
Ingredients:
Raw Sesame Seeds
Kikkoman Soy Sauce
Brown Sugar
Ground Pepper
Boneless Chicken Thighs (with Skin)
Griller or Oven
Minced or Grated Ginger (not so much... otherwise it will be spicy)
1 tsp Mirin
Water
cornstarch

1. Roast your sesame seeds in pan (without oil), med heat. If fragrant, remove from heat. Set Aside.
2. Marinade Chicken with Kikkoman Soy Sauce and 1 tsp of brown sugar. Sit for 30 mins, better if marinated over night.
3. Grill or roast your chicken. It will take about 20-30mins grilling. and 30 mins with pre-heated oven (325F).
4. Slice into strips (Serving size).

For the Teriyaki Sauce:
4. Mix water, kikkoman, brown sugar, ground pepper, mirin and ginger. Bring to boil. (sorry, i dont really measue the ingredients, just make "tancha" on sweetness and saltiness... it should blend together)
5. If sauce is ok, mix about half or 1tsp of cornstarch in 1 tbsp of water, then pour over your sauce to thicken. add 1tsp of roasted sesame seeds. 

6. Arrange chicken onto your serving dish, pour over the teriyaki sauce, sprinkle with sesame seeds to garnish.

Serve.

Tips:The Charcoal or stone grilling will give an exquisite aroma onto your dish. Brush with reserve marinade while grilling your chicken to prevent the dryness. 

Don't make your marinade too salty and too dark. 

In grilling, turn your chicken with care every now and then, we still want the chicken skin!

Thank you... 

SORRY! I DON'T MEASURE THE INGREDIENTS, I STILL HOPE THIS HELPS!

Kakeage

Ingredients:
Batter:
Flour and cornstarch (ratio 75% flour and 25% cornstarch)
Egg yolk
Very "very" cold ice water (to make it crispy)
***ANY BRAND WILL DO. flour is just the same.
Veggies:
Bell pepper green or red
Baguio beans remove beans
Carrots
Sweet Potatoes
White Onions
***Slice in thin strips (shoe String or thicker, Julienne). 
Add Squid or Shrimps (Optional)
1. Mix matter. Don't mix and make it too long because we want to maintain the temperature of the batter. 
2. How to make "tancha" if amount of water is ok? Dip your finger. Should be batter kumapit na sa finger mo...
3. If everything is ok. Combine veggies and batter.
4. Heat oil. Must be deep fry. If u have hi pressured burner.. heat oil in less than 5mins.. if not... med heat... heat oil in less than 10mins.
Tips: How will u know if oil is ready to fry? Make few little drops of batter in the heating oil, if it floats, it is ready. 
Group together the veggies.. using your hand... then fry... It will take a while in frying so that the batter will be cooked thoroughly
For the Tempura sauce:
Kikkoman Soy Sauce
Brown sugar
Minced ginger and radish
drops of Mirin
Water
1. heat everything, and bring to boil. 
Serve...

SORRY I DON'T USUALLY MEASURE THE INGREDIENTS. I STILL HOPE THIS HELPS!

INTRODUCTION

First of all, I would like to introduce myself.. I am a Mom of 2 wonderful kids and really loves cooking! I never tried blogging yet, but since i get lots of messages from my Facebook account, text messages and calls about cooking, I decided to create a blog site of my own, so that I could divert all the questions and tips here for people and friends who are very much interested in learning how to cook...

Most people I know who loves to cook never give or tell  their recipes. Each cook/chef have their little own secrets which they don't wanna really share, oh well, I still believe in that, and sometimes I also do. 

I don't really believe in cook books, well, I have some, a small library, it was given to me by friends and relatives, I never bought any from the bookstore nor asked somebody to buy me cook books...  I knew from my heart, that when I lit my flame, my brain begins to play...

Creativeness does not only come with papers, colors and scissors. It also applies in music, literature, mechanical, leadership and cooking skills.  

I started cooking when I was young. It all started when I was 7 years old, as far I could remember, I learnt how to cook instant noodles at first, the flame did not fear me of continue learning in the kitchen... as years pass by, I mastered cooking Plain Rice, Garlic Rice/Fried Rice, French Fries, Sauteing Sardines, frying SPAM, Omelettes, doing simple snacks, making our home made Gulaman (Jelly) Drink and etc. And I also mastered chopping, slicing, peeling and washing the dishes as well. 

I enjoyed staying in the kitchen and eating too. I grew up being so exposed to my elder Brother... Since I was blessed with busy parents, I decided to move and got matured faster than my age. I was never a brat nor had Yaya. Whenever me and my brother were hungry from our play, we would always check the pantry and try out snacks from scratch. So far, we survived our childhood fast and FAT!

I got exposed more and more in my tiny kitchen when I got married. I started cooking for my new family... Yes I had my downs in the kitchen, however, I never gave up learning... 

I mastered my skills with emergency parties, emergency gatherings and quick snack for visitors... I finally learned to cook and prepare four (4) to five (5) dishes in just one hour including desserts and special drinks. 

I will also admit that, I had cuts and burns all over my arms and hands, and also experienced burning as well. It was part of the learning process and I believe that despite of everything, I still discover new things as I get older.  

I love every corners of my kitchen... I like cooking Filipino, Western, Chinese, Italian, Mongolian,   Japanese, and little of the Thais,, Indian and Singaporean Dishes. I also love making empanadas,  baking breads, cookies, and muffins. I also do my own concoction of Milk teas, home brewed Iced Teas, Special blended Coffee, Chocolate drinks and more. 

I started selling my Brownies in the year 2004-2007. With my small scaled oven, I was able to produce and cater a lot of customers with unexpected numbers of boxes per day. I got bored with the smell of my Chocolate brownies, I shifted into selling my French Apple Pies. Later on, I bought a bigger oven, and again, it always made me so busy during holiday seasons....

While baking goodies for friends, families and customers, I was able to accept cooking orders to numerous satisfied customers, and was able to continue this cooking business up to this very day.  The best seller of all time is my "BEEF LENGUA."

I will continue the journey and share my knowledge, and help friends and families to overcome their unique daily kitchen troubles.

I assure you doable recipes in my future posts. See yah!